3 Easy Steps To Setting Up Three-Point-Lighting
Lighting is the most important aspect of getting really good video quality. In fact, they use three point lighting on all movies, TV shows, and music videos. So today we're going to teach you how to set up each light, and what it does.
What is 3-Point Lighting?
The Three Point Lighting Technique is a standard method used in visual media such as video, film, still photography and computer-generated imagery. It is a simple but versatile system which forms the basis of most lighting. The technique uses three lights called the key light, fill light and back light.
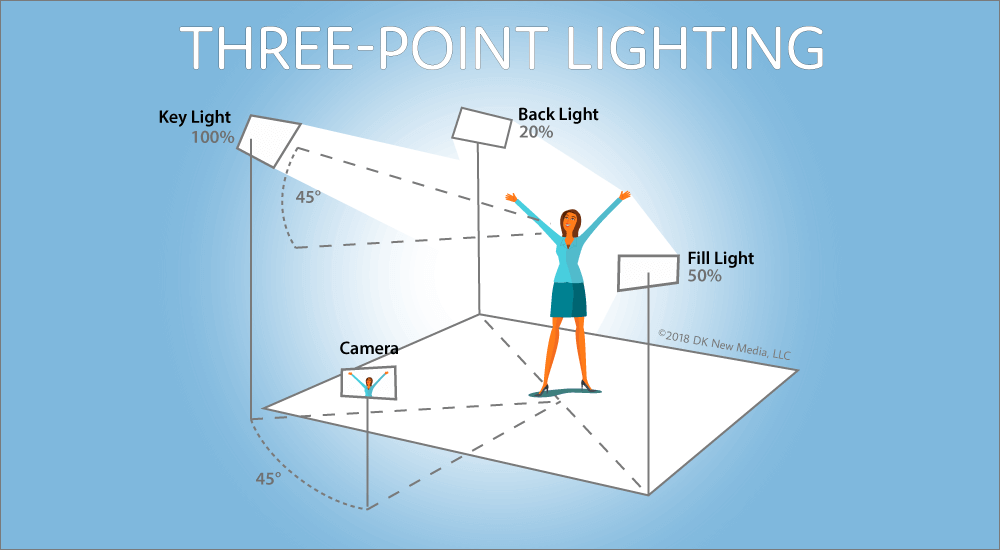
Three light sources
- Key light: This is the main light source. It shines directly on the subject, usually from the front right or front left, and it establishes the overall look and feel of the shot.

- Fill light: The fill light provides balance to the key light by ‘filling in’ the rest of the subject’s face with softer light. It should be positioned to the side that’s opposite the key light.

- Back light: The back light creates a flattering rim of light around the subject, separating him or her from the background. Sometimes the back light is called a rim light.

-
Set up your Key Light
Your key light should be your primary light source. You should put it on the right or left of the camera, 45° from it, pointing 45° down on your face (or whatever you are filming, maybe your hands or your desk if you are making something). If the shadows are too harsh, you can use a diffuser.
-
Set Up Your Fill Light
The fill light should shine on you from the side opposite of the key light. The smaller angle of this lighting is going to lessen the shadow produced by the key light. This light should be diffused and about half the brightness of the key light. However, don't over do it with the brightness. Some shadows are okay because that's what shapes the subject.
Pro Tip: If you don't have a fill light that dims, pull it further away from your subject to soften the light shining on the subject.
-
Set Up Your Back Light
The backlight is also known as the rim, hair, or shoulder light, and it has to shine on you from behind. The main purpose of this light is to create separation between the subject (you) & the background. Most newbies don't usually have this lighting setup which often makes the subject (you) fall & mix into the background. But with the right back light it can help you really add that pop. Using a light that is bicolor & can change temperatures is KEY for any backlight!
Here's a Secret Lighting Technique used on movies, and TV shows. This is going to make you stand out on YouTube!
It's called Motivated Lighting: By adding a small lamp in the background of your videos it creates the natural appearance for your backlight & gives you more warmth.

1 comment
Got my attention and I’m interested in knowing more and how to purchase and cost.
Thank you